How to Add Subtitles to a Video?
Today we’re going to talk about subtitles – How to add subtitles to a video permanently with the new feature of YouTube or something video editing software. Stay tuned!
As a YouTube creator, do you care about your subscribers and search ranking? I bet you want them to feel comfortable and enjoy watching your videos, don’t you?
Then you definitely need to add subtitles to the videos you post! Adding subtitles or closed captions in YouTube can help you with your search ranking. You can add subtitles to your own videos, to other creators’ videos, and you can even let your viewers add subtitles themselves. YouTube gives you a lot of opportunities!
Why do you need subtitles?
- Adding subtitles or closed captions are definitely essential for sound-off videos. If you don’t have subtitles, people will get no idea about what it’s about. Your video might not get watched.
- You’re able to control the look and feel of your captions and provide a better viewing experience for your subscriber.
- YouTube will pick up on keywords in your video and help to find the right place for it. So adding subtitles in your YouTube video could help you with your search rankings.
- If it is suddenly that there’s no sound in your video, by hitting the subtitles button people will understand everything that’s going on the screen.
- Subtitles provide the opportunity to help you understand the speaker in a different language.
- If your video has a bad sound or mumbling speakers, or your video viewer have some hearing impairment, subtitles will be especially useful.
- Adding captions to a video actually looked good every single time!
How to Add Subtitles to Videos?
There’re several ways you can add subtitles to your video. Then in the following page, we will learn up-to-date marketing tactics to grow your business with online video. Each time we upload a new video, go ahead and do this what we’re going to create today.
The first is to upload a pre-made video file with subtitles that was created in a special program. Save your file in one of these YouTube compatible formats and upload it to your video.
The second way to add subtitles is the one we always use. In our opinion, it’s the easiest and the most convenient way to add subtitles. Let’s have a look at how we do it.
I’m going to show you how to put subtitles directly on the video file so that when you upload it, the subtitles will always be there. Plus, you’re able to get more control over the captions/subtitles this way. For example, you can change the colors and the font, turn them on or off for future exports. Okay, let’s jump into full training on how to add subtitles to a video today.
Way 1: How to Add subtitles to a video permanently with Filmora?
You’re going to start by download Filmora9 on your Mac or your PC. This software works on both and you can get the link to the 30-day free trial in the following download link.
Once installed, you’re going to hear the fun music sort of playing in the background. And Filmora9 video editing software is going to open up with an in-depth tutorial that is already starting to play for you. What we’re going to do is start a whole new project file.
Steps for adding subtitles / captions:
Step 1. Import a new project and add captions
To do that we’re going to go up here to File. Click on “New Project” and here we have the main area of Filmora9. Notice that we’ve got our viewing area in the primary window, and the timeline down here and over to the left we have our tool boxes.
- The first thing that I’m going to do is import the media file that I want to add captions to.
- Then drag and drop the video tracks onto the timeline.

Step 2. Add subtitles to video
- After importing the file you want to add subtitles to, go to the Titles tab and select subtitles from the preset templates.
- It’s very easy to drag the selected subtitles onto the next part of the timeline.
- And you can see that there’s some preset text there.
- The next thing you’re gonna do is double-click on it. And this is where you’re gonna want to add your own customized subtitles.

If you’re using a different language with special characters, you can write out your sentence in another document with the special characters. Then copy and paste the character from the document right into Filmora to replace the preset text subtitle.
Step 3. Customize the subtitles for your video
The next thing you’ll notice is that to delete any extra subtitles, you have to go into the advanced option and then click on the extra line and delete it. And you can adjust the text box and move around it as well.
What’s more, you can also apply presets and animation, add more text borders and shapes, text fill and shadow, by double-clicking the title in your timeline.

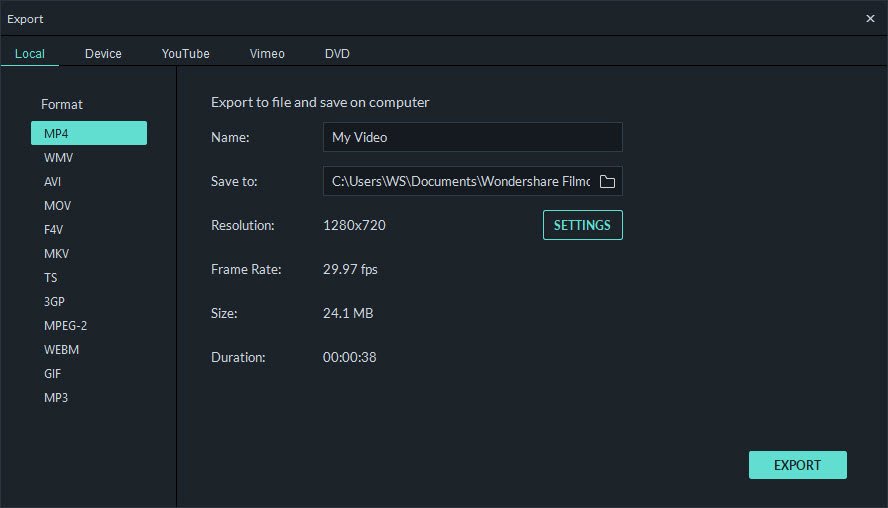
Step 4. Exporting your video with subtitles
After all the subtitles editing, you can burn subtitles to your video. Simply click on Export button on the top right of the panel to open the output panel.
Select AVI, MOV, WMV, or MP4 as your output format, or you can just pick up a configured format for your specific device. And you can burn the video to DVD for playback on any standard DVD player or TV, or share it with your friends via YouTube and Vimeo.
Way 2: Put subtitles on YouTube videos online?
If your video has a bad sound or mumbling speakers, or your viewers have some hearing impairment, that’s when subtitles come in really handy. And your viewers will thank you for them.
When you watch a video in a different language, subtitles will help you understand the speaker. The cc button turns on the subtitle. To enable subtitles in YouTube video, go to Settings – Subtitles and choose your language from the list.
how to find video manager on my youtube channel?
As many YouTube creator know, you can turn on Subtitles/CC option by going into the Video Manager of your YouTube account. Recently YouTube has changed the location of the Video Manager again and I’m going to help you to locate it.
- After signing into your YouTube account, the first thing you do is go to your avatar and come down to Settings.

- Go over here to View additional features and there’s your Video Manager on the left.

- The video manager will take you to a page that displays all your videos. Click the little triangle icon beside Edit of your video, select Subtitles/CC.

- Here you can click Add new subtitles or CC and then choose the language for your subtitles. Remember that with this approach, you can only choose the original video language.
- Then choose how you want to add subtitles or closed captions to this video.
- Now add the text of the video in the blank space. We usually just copy and paste our scripts – you can do the same or enter the text yourself.
- Click Transcribe and auto-sync tab.
- After adding the text, go ahead click Set timing.
- Wait a bit, then set the timing manually for the best results.
- Now you can move and edit the subtitles on the timeline.
- You’ve made it! Once you have made your corrections, you are ready to publish the edits!
You’ve made it! Once you’ve made your editions, you can press “Publish” and your subtitles will be uploaded to your video.
Way 3: Turn on community contributions for YouTube subtitles
This is the third way you can add subtitles. It’s called community contributions.
Creators of popular videos are always looking for ways to interact with their audience as often as possible, creating interactivity on their channels.
Asking people to subscribe, leave a like or click on a link – these are the ways to get closer to your audience. Adding subtitles is another way to engage in audience participation.
This YouTube tool is called Community contributions – where you allow audience to transcribe or translate your closed captions, subtitles, or even your title and description.
This can help you to create a strong community around your videos, where you trust each other and each person can contribute something to your channel. How to turn on community contributions on for YouTube on your channel?
- Sign in your YouTube account and go to YouTube Studio beta.
- Here you can see the videos you’ve uploaded. If you want to enable contributions for all videos, click Transactions option from the left menu.
- From the top, select Community.
- Click on Turn on button to enable community contributions.
- From the left menu, select Videos get your video list here.
- Enter the video editing panel by clicking the title or thumbnail of the video you’d like to edit.
- Click on Transcriptions option from the left menu.
- If you haven’t set the language for your video.
- Then select the Community Contributions box and choose On for this video.
You can also go to the Community tab and turn on the Community contribution for all your videos.
As you can see, subtitles is a very useful tool. They make your video easy to watch, and easy to adapt to any situation or language. But more importantly, it shows trust and enables interaction with your viewers.
Today you’ve learnt how to add subtitles to your video. Isn’t that awesome?